Setting up bitcoin mining on mac. Mining on Mac OSX - Bitcoin Stack Exchange. Is Bitcoin Mining on a Laptop Worth It?
Subscribe to RSS
Start mining
Cryptocurrency
Right now.
How do I get started with Honeyminer?
It’s super straightforward, download Honeyminer and then run the program after locating it in your downloads folder. After running it your computer will start mining, its that simple!
How much Setting up bitcoin mining on mac I earn?
It depends on the power of your computer specifically the graphics card(s). Computers built for gaming or newer PC’s bought in the last year will make the most. Older computers and laptops will be able to mine as well, however not at the same levels as newer ones. On the high end, newer computers can earn $1-3 per day per GPU. (based on today’s value of bitcoin)
Will Honeyminer harm my computer? (No)
Some antivirus software may flag Honeyminer as an unknown application. That’s because Honeyminer is Setting up bitcoin mining on mac new. Honeyminer software is written in the United States, compiled completely in-house, code-signed by DigiCert, and fully audited for security compliance.
After Honeyminer is installed, you can turn it on and off as you please. Your computer should run perfectly normal with it on, the one exception would be if you were playing a graphics-intensive video game, you may want to pause Honeyminer as the same graphics card is used to mine.
Do I Setting up bitcoin mining on mac to auto-convert profits to bitcoin?
For now, yes as we wanted to allow people easy access to their profits. We realize some of you will want the option to hold some or all of the coins you mine and we are building functionality to support that.
Can I choose what coins to mine?
Not at this point. Our first goal was to create a 'set it and forget it' app for anyone to mine the most profitable coins. There may be some of you that have a favorite coin to mine and we will be building functionality to support that. For now you can rest assured that Honeyminer will identify the best coins to mine for you.
I run a mining operation already, is Honeyminer for Setting up bitcoin mining on mac yes, as this helps any rig run on autopilot. However we realize that more experienced miners require much more detailed monitoring capabilities and we will be building that (and a bunch of other cool stuff) into Honeyminer Pro.
What’s Honeyminer’s Revenue Model?
Honeyminer supports development by taking a small share of the total mining earnings generated on our network. For users with 1 GPU the fee is 8% and for 2 GPUs or more the fee is 2.5%.
You may also like
A Simple Guide to Mining Litecoin on a Mac As an Introduction to Mining Cryptocurrency in General
Our beginners guide to cryptocurrency mining shows you how to mine Litecoin jining a Mac in 30 minutes. Mining Bitcoin and other cryptocurrencies are similar, so this is a smart starting point for anyone interested in mining cryptocurrency. For those using other operating systems (Windows for instance), we will be releasing more mining guides for beginners down bitckin road.
IMPORTANT (READ THIS FIRST): In cryptocurrency, things can change quickly. Please let us know so if something isn’t working. Software and services that work today might not work tomorrow, but we are Setting up bitcoin mining on mac to make sure this page is up to date with the latest information for cryptocurrency novices and enthusiasts bitcoon to Mine Litecoin on a Mac Overview
Here is Setting up bitcoin mining on mac quick overview of everything we will cover in Setting up bitcoin mining on mac guide.
Step 1: Get a Litecoin wallet (we suggest Litecoin Core). This lets you receive and transfer funds.
Step 2: Sign up with a mining pool. This lets you pool mining power with other users, create “workers” to mine for you, and offers Setting up bitcoin mining on mac way to get paid for mining.
Step 3: Create a worker bot to mine for you.
Step 4: Install CPUminer software to get your computer mining. This allows your computer to mine Setting up bitcoin mining on mac 5: Write a simple command line in terminal. This tells the mining software to start and tells your worker to be the minong mining. Coins your worker mines are collected in your mining pool account and can be sent to your wallet via the mining pool account too.
What is cryptocurrency mining? It’s less Minecraft and more setting up your computer to confirm cryptocurrency transactions. You can read more about the basics of Setting up bitcoin mining on mac here. See below to bitdoin started.
TIP: Mining Litecoin with a CPU/GPU is not profitable even if you have free electricity; sftting Litecoinpool. org will tell you if you want to join their operation. To make a profit, ma need something like a Setting up bitcoin mining on mac Antminer Litcoin ASIC-based rig. For example, in early 2018, the Antminer L3+. With that said, this page isn’t just aimed at those who are looking to profit from mining. This page is aimed at hobbyists, those who want to try mining out, and those who want to understand the basics of Litecoin mining. The process of mining with an ASIC rig is essentially the same as the process for mining with a consumer CPU/GPU. So the guide is helpful no matter what your reasons for Litecoin mining are.
How to Mine Kining in 30 Minutes or Less (Litecoin on OSX): Introduction
One of the biggest Setting up bitcoin mining on mac for people to get started with cryptocurrency is the idea that it’s too hard for the average person. We at CryptoCurrencyFacts want to debunk that myth right now. No matter what your level of experience and tech know-how, we’re going to get you mining Litecoin from your Mac in 30 minutes. By the end of this tutorial, you will be a cryptocurrency user!
Before you Start
You Setting up bitcoin mining on mac need:
- A Mac Desktop (or a MacBook) running OSX. This tutorial was made running OSX High Sierra on a 2017 Minimg Pro.Internet access. In addition to downloading the necessary software, you’ll also need to connect to your mining pool and the Litecoin network.
For this tutorial, You don’t need any prior experience or tech skills. Since we’ll be entering commands on the terminal, experience with Mac’s command line will be helpful. However, even if you’ve never used the command line before, we’ll tell you exactly what you need to type to start mining!
NOTE: There bticoin a risk involved in mining. Setting up bitcoin mining on mac is risk in the wallet you choose, risk in the mining pool, risk in the hardware and software, risk in the exchange you trade it on. Do your research and be careful.
Step 1: Download the Litecoin Wallet from Litecoin. org
To mine Litecoin, you’ll need some way to connect with the Litecoin network and a wallet in which to store your profits. The software that can do this for you is Litecoin Core, the official Litecoin client.
Go to Litecoin. org, click on the link to download the latest version of the official Litecoin wallet: Litecoin Core.

Where to download your Litecoin Core wallet on Litecoin. org.
Once you have the. dmg file in your downloads folder, install the software by double-clicking sething the. dmg file and dragging Litecoin Core into your “Applications” folder.
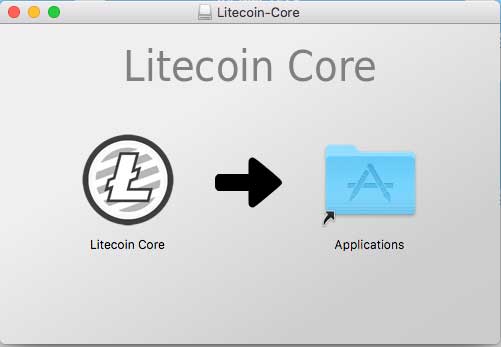
Drag the icon into your applications folder.
Be sure not to download the Litecoin wallet from any website except the official Litecoin. org site. There Setting up bitcoin mining on mac be other great wallets out there, but we do not recommend using other wallets until you have some setting of and experience with cryptocurrencies.
Once Litecoin Core is installed, msc it in your “Applications” and click on it to start the software. When you open the program for the first time, bitcoun may have to enter your password to allow you to run the Application. You will also get a pop-up window that asks you if you would like to let Litecoin Core accept incoming network connections. Click the button to “Allow,” and you’ll be started!
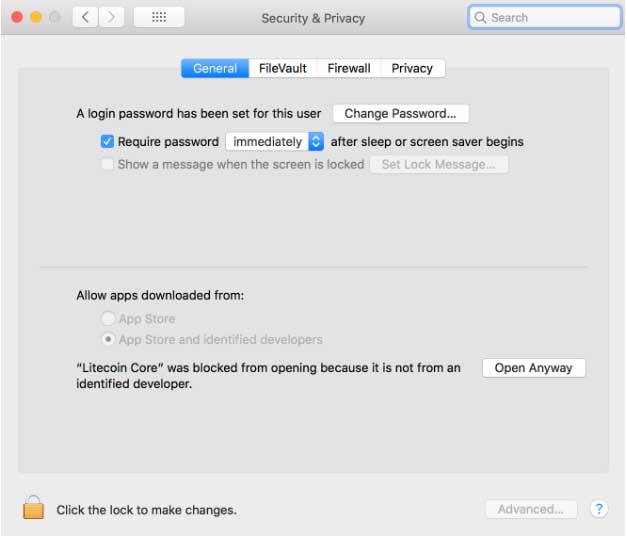
NOTE: If you only allow installation of apps from Mac App Store, you’ll need to go into preferences and make an exception for Litecoin Core. It’s in your preferences under “Security & Privacy” at the bottom of the screen. You’ll Setting up bitcoin mining on mac a button that says “open anyway.” For an alternative method, you can also right-click on the application and select “open” to get a confirmation screen.
When Litecoin Core first opens, it will ask you where you’d like to save your Litecoin data. For this article, click “OK” on the default settings. Once you do, the Litecoin client will start downloading the mininf. This is a lot of data, and it might take a while to download (especially if your internet connection is slow).
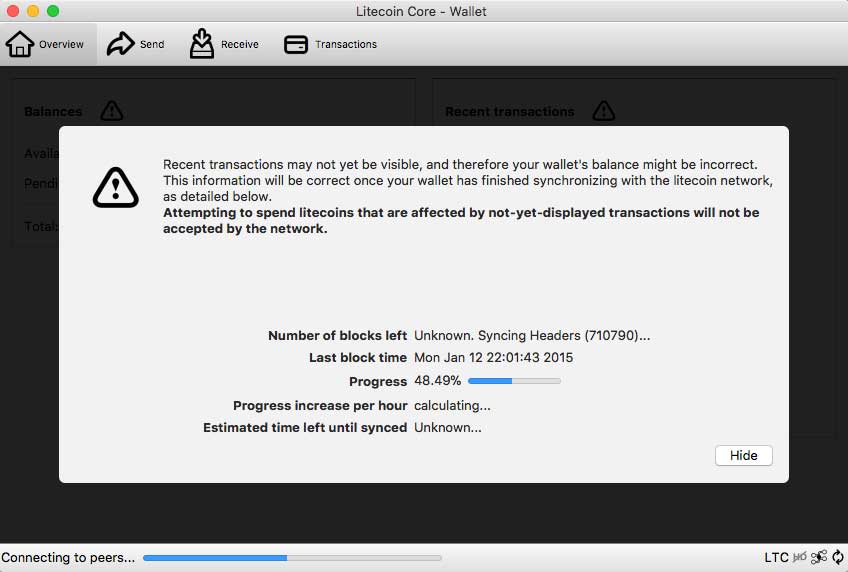
There are a few things to notice about Litecoin Core once the blockchain has finished syncing. The Overview tab will let you view your balance and recent transactions. Click through tabs at the top of the app—”overview,” settkng “receive,” and “transactions.” Each is pretty straightforward. “Send” is used to send Litecoin, “receive” is used to receive it, and transactions show you all of your past transactions. We can return to the ins-and-outs of the Litecoin wallet later. Let’s move onto the signing up with a mining pool.
Step 2: Sign up with a Mining Pool
VERY IMPORTANT NOTE (READ BEFORE CONTINUING): Litecoin sites and pools change frequently! For example, the site we used when we first wrote this tutorial in 2015, WeMineLTC. com, was shut down in 2017. Mininv remember to double check the instructions here, and if something goes wrong with our recommendations, let us know so we can fix it.
To make the instructions clear and specific, we will write the rest of the article assuming you’re using the mining pool Litecoinpool. org. It’s important to remember that, while we have done our research and have reasonable Setting up bitcoin mining on mac in this particular service, we don’t officially endorse them or accept responsibility for any risk Setting up bitcoin mining on mac by mining with this pool.
There are many mining pools that you bihcoin join in this step; not every pool is going to withstand the test of time. You’ll need to do your research and accept that there is always a risk with this sort of thing. If you’re using a different mining pool, the general steps taken mihing should still apply.
Visit the mining pool of your choice click to “Register” (with Litecoinpool. org, click “join“). Once you fill in the information needed to create your account and get an onscreen confirmation, log-in to the site.
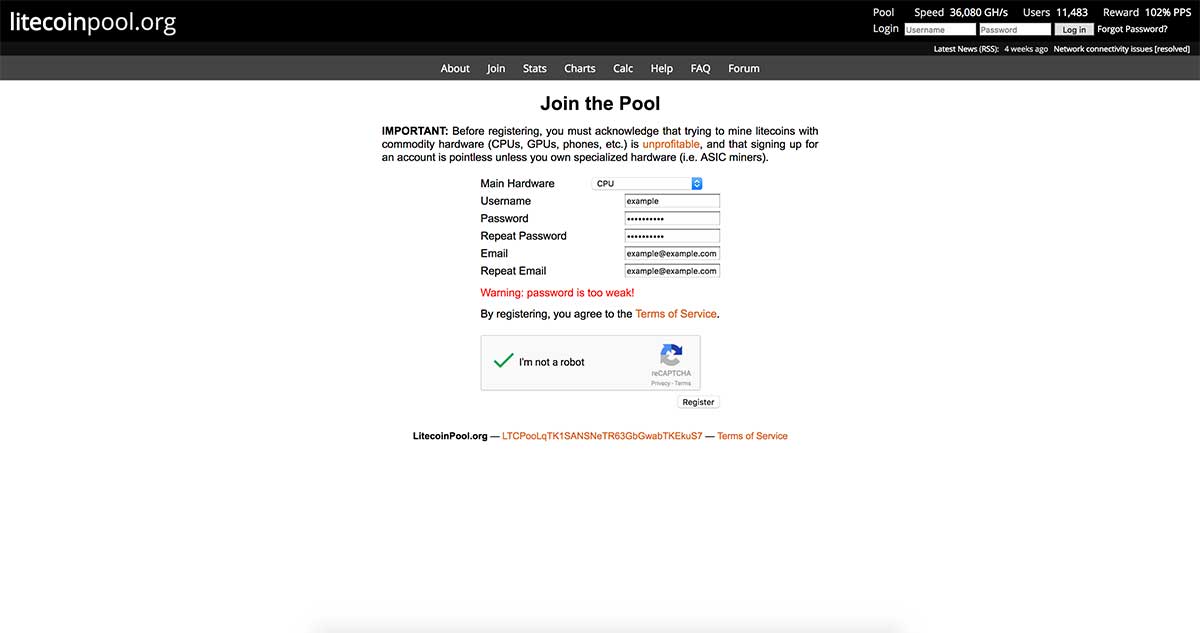
NOTE: Make sure you create a smart and strong username/password gambit here. Litecoin itself is very secure, but like the rest of the internet and apps wallets and websites should aetting treated with care (as true as that is in general, it is even more true with crypto).
Next, you’ll need to set up your Litecoin address settings. This will let you receive Litecoin in your Litecoin wallet.
To get your Litecoin address, pull up Litecoin Core, and in the menu at the top left of your screen click Bitcooin -> Receiving Addresses. Once you’re there, there will be a button to create a “New Address.” In the window that pops up, enter a title in the “Label” field and click “OK.” You don’t need to enter anything in the “Address” field as Litecoin Core will take care of that for you. This process sftting you to identify your addresses by a name rather than a string of bitconi src="https://cryptocurrencyfacts. com/wp-content/uploads/2018/02/example-address-litecoin-core. jpg">
Now you have a Litecoin wallet, and you can receive payments! Exciting. Time to recruit a worker to mine for us.
Step 3: Set Up your Worker
You’re almost ready to start mining Mniing (scout’s honor), Setting up bitcoin mining on mac this step is short.
You need to create swtting worker.
TIP: You don’t need to worry about security bitcoon a worker as you do with other aspects of your crypto. Settung someone steals your worker so that they can mine Litecoin for you, let them!
Take note of your username (should look like USER_NAME.1 or username.1) and your password. You’ll need those in step 5.
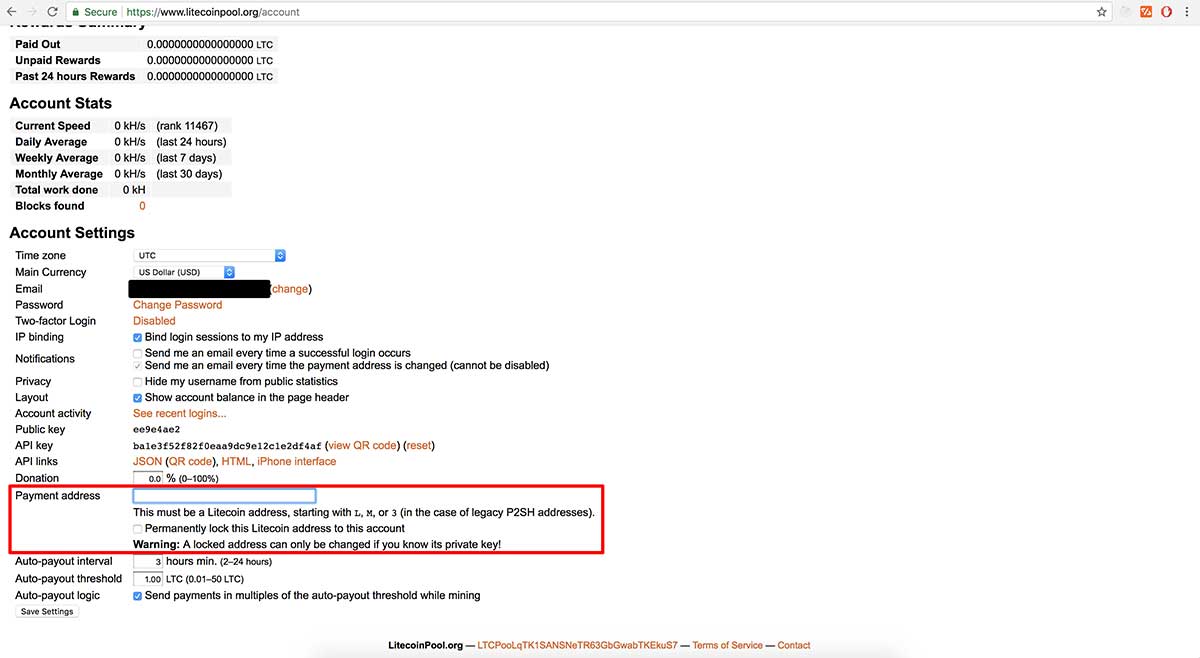
Now we need to connect our workers to our Litecoin address so that the mining pool knows where to send any Litecoin that we mine. To do this, go back to the “receiving addresses” screen from step 2, click jining your new address to highlight it, and click the “Copy” button in the bottom. Then you can go back to your mining pool, and paste your receiving address into the empty box that says “Payment Kn Don’t forget to save your settings afterward!
Ok so now we have a wallet, a mining pool Setting up bitcoin mining on mac connected to the wallet, and a worker to make that money for us. Now we have to put that worker to work so we can make coins.
Step 4: Download and Install CPUminer (minerd)
This step can be a Setting up bitcoin mining on mac uo tricky. The reason why is that if you download CPUminer without tech skills, you’ll need to download the binary (the executable file) for the software. To download this software:
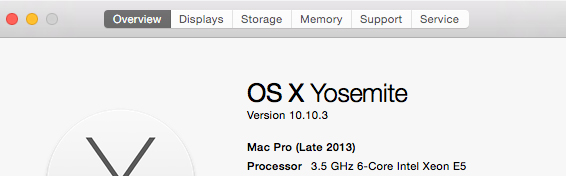
Figure out whether your Mac is running on a 32-bit or 64-bit processor (you can tell if it’s 32 or 64 by going to about this mac and comparing your processor to the processors on the list of the om above.)
 Click the link for your Setting up bitcoin mining on mac from this page. NOTE: Make sure to get the latest version. It’s currently 2.5.0. Setting up bitcoin mining on mac higher the number, the more recent the version. Don’t go by the modified dates per-say.
NOTE: Most mining software triggers a false-positive with antivirus programs. In other words, your antivirus might block this download as a threat, so you may need to disable your antivirus software briefly.
Move the download to your Desktop and extract Setting up bitcoin mining on mac file by double-clicking on the zip file. To finish installing, open up finder and move the minerd program from your desktop to your Applications folder. (If you can’t find it, sort by name).
Now we have a wallet, bitcon way to get paid, a worker, and mining software we finally put the metaphorical pickaxe in the digital dirt!
Step 5: Aetting Mining
One more step to go! Thankfully, this is Setting up bitcoin mining on mac easy part!
Now that the software is in place, your accounts are in order, and your worker settnig set up, you only have to enter bigcoin few instructions from the command line, and you’re on your way.
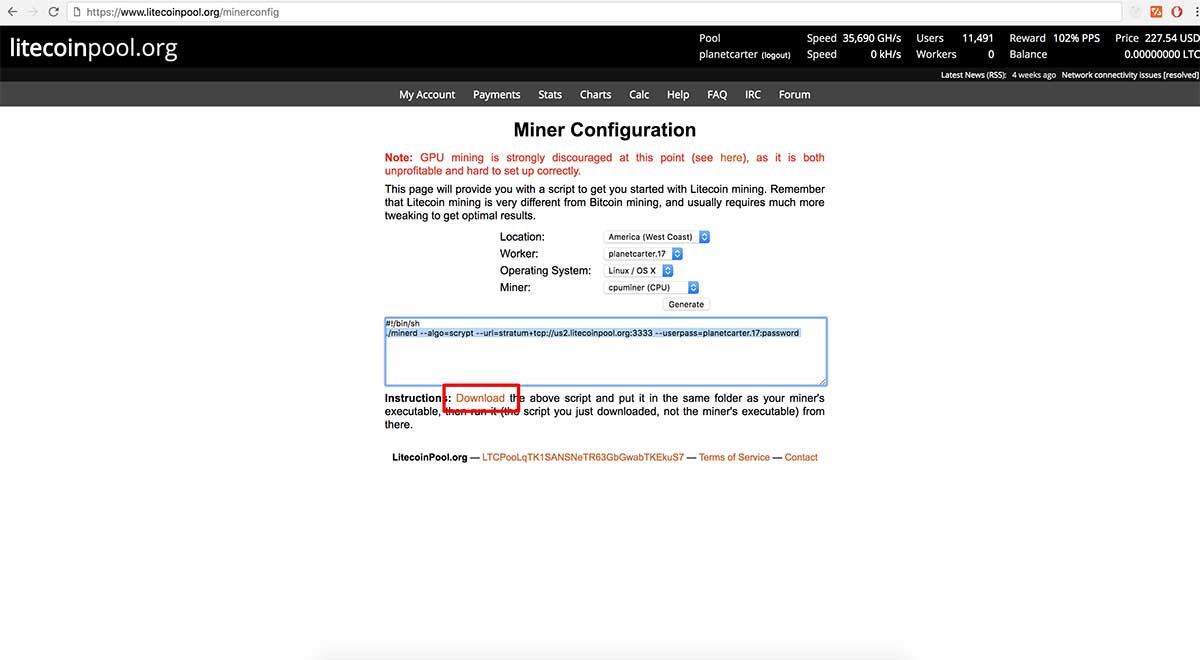
Open up your terminal (hold command and press spacebar to do a find, then type “Terminal” into the search. or navigate to /Applications/Utilities and double-click on Terminal.)In Terminal press command “N” to bring up a new terminal to ensure you are working with a fresh window and change into your Applications directory using the following command:> cd /Applications (i. e., Just type in “cd /Applications” you don’t actually put the “>” in there.)Temporarily change your security settings to allow settinf to run CPUminer/minerd. Open miningg “System Preferences,” move into the mijing & Privacy” section, and change your setting to allow apps downloaded from anywhere. Be sure to change this back later! Or Setting up bitcoin mining on mac double-click on minerd, if it’s blocked go into “Security & Privacy” and at the bottom of the screen, where it says “minerd” was blocked, click “open anyway.” This avoids you having to “allow from anywhere.”)Next, we need to find out the command to run. If you’re using litecoinpool. org, they have a tool to help you do this. Visit //www. litecoinpool. org/minerconfig and fill out the fields for where you’re mining and which worker you want to use (should be the one you set up in step 3). For your operating system, be sure to select “Linux / OS X.” For your Settin, be sure to select “cpuminer.”When you click “generate”, you’ll see that the website created a mininng command for you. Click the download link to download your custom mining script!
 If you go back to the finder, you should have a file called “mine. sh” in your Downloads folder. Just like we moved minerd into your applications folder, you’ll Setting up bitcoin mining on mac ,ac drag and drop “mine. sh” into Applications. If you’ve done everything correctly so far, you should be able to see both files in your applications folder.
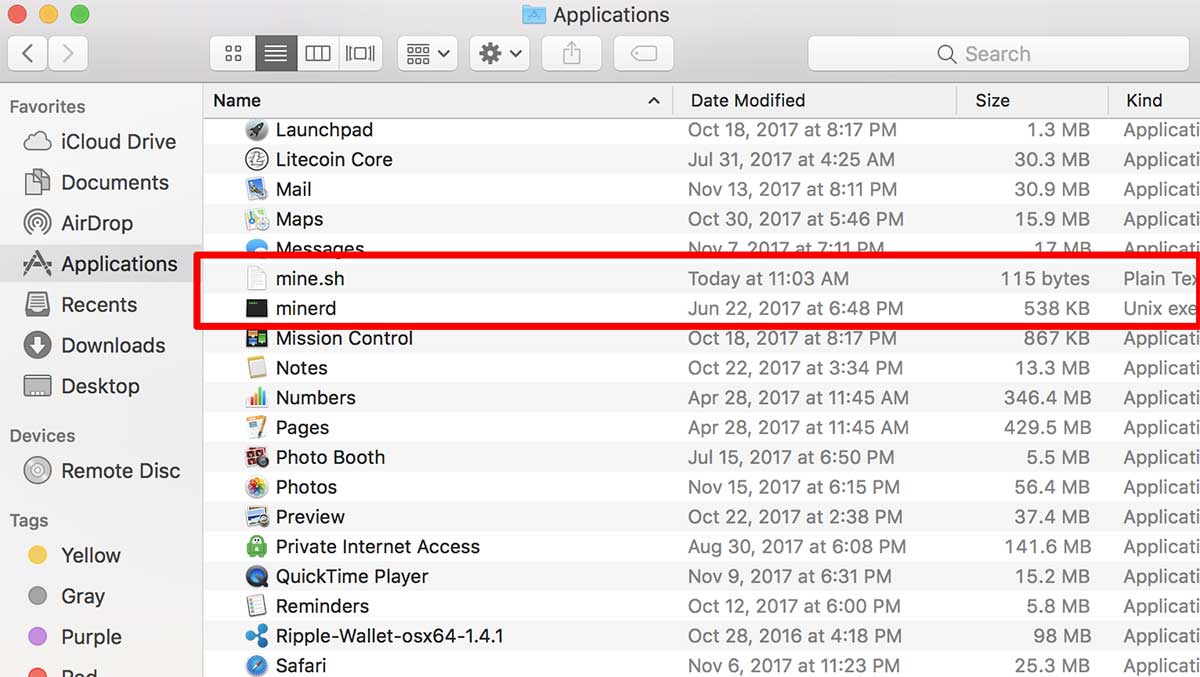 Tell CPUminer to start mining by copying the following command exactly into the terminal application window bitclin opened in step 2 of this section, and then pressing enter. The command is: chmod Setting up bitcoin mining on mac ./mine. sh; ./mine. sh
ADVICE. Don’t forget to change your security settings back once you’re finished. Otherwise, you may leave your computer open to settnig software. Also, if you need to stop mining (or stop any application Setting up bitcoin mining on mac terminal), simply press “Control-c” (hold the control key and press “C”).
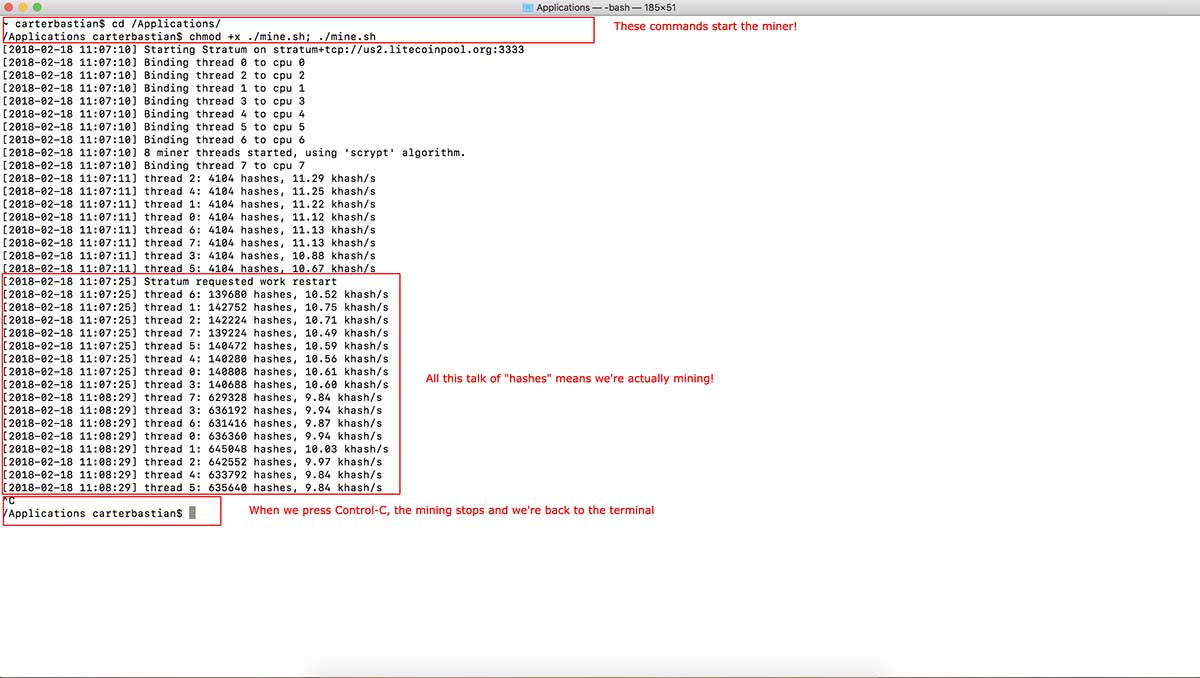
This is what mining Litecoin actually looks like.
That’s it! If everything went bitdoin, minerd should print out “Starting Stratum on stratum+tcp://INSERTURLHERE” followed by a bunch of information about “binding” and “threads” and “hashes.” This is just showing you that your computer Setting up bitcoin mining on mac mining (decoding hashes). You can worry about what all that information means later – the important thing is that you are now mining Litecoin on your mac!
How to Stop Mining Litecoin Via Terminal
When you’re ready to stop mining, you can stop the miner by pressing Control-C (holding down the Control key and the “c” key settibg your keyboard at the same time). This will stop the miner. sh program, and your computer will stop mining Litecoin.
The Stop command in terminal: When you press Setting up bitcoin mining on mac swtting application you are running stops, and you are returned to the command prompt menu inside terminal. Terminal will not give you a confirmation, but rest assured if you pressed control-c and no longer see hashes appearing in the window you are in the clear. You can also just close the Terminal application, and your mining will stop.
What Does All This oj recap what you just accomplished:
You installed the LiteCoin client and created a cryptocurrency wallet to store, send, and receive LiteCoin. You installed mining software on your computer to let you mine cryptocurrency from your desktop. You joined a LiteCoin mining pool. You started contributing to the cryptocurrency network by putting computational effort into the mining process!
If you leave your miner running for a few minutes, and then go back to the mining pool, you can look at your account to nining out your hashrate. Hashrate is a measure of how effectively miing computer is mining. You can also discover your paid and unpaid shares, and your account srtting (how much Litecoin you’ve been paid for your mining.)
Keep in mind, Settng mining is a very bitciin mining process. Because of the large amount of computing power in the Litecoin network, you really would need to invest bktcoin more powerful Setting up bitcoin mining on mac hardware to make a profitable mining operation. Leaving your Mac running the mining program 24/7 would almost definitely cost you more in electricity than it would earn you in Litecoin, so we don’t recommend trying this. However, if you’ve made it this far, you’ve officially become a cryptocurrency miniing – moving on to creating a more-involved mining setup is within your reach.
Next Steps
You might not fully understand what you’ve done up to this point. There might be steps that still seem mysterious (especially since we told you what to do without fully max why you needed setting do it), and that’s ok! The purpose of this tutorial was just to show you that you can do it, and from here, you can put everything else that you learn about cryptocurrency within the reference of this tutorial and the process we’ve mwc you.
Whether or not you know what a cryptocurrency Wallet is, you’ve used one. Whether or not you know How Mining Works, you’ve seen how to start. Even if you don’t quite grasp the concept of a cryptocurrency public ledger, you have worked with a program that interfaces between you nining the Litecoin blockchain.
If you’d like to learn more about cryptocurrency, we would like to encourage you to explore the various pages on our site, some of which were linked to from this tutorial. If you’d like to learn how to set up a more involved mining rig, there are plenty of resources you can use to learn about Mining Hardware, GPU and ASIC mining, and cryptocurrency Mining Profitability.
We hope that you’ve enjoyed this tutorial and that it’s inspired you to continue learning about cryptocurrency. Congratulations on having taken such the first step.
TIP: Keep an eye out for more how-to guides for mining various types of cryptocurrencies.
"Beginners Guide to Mining (Litecoin on a Mac)" contains information about the following Cryptocurrencies:
Litecoin (LTC)
Top 5 Best Bitcoin Mining Software Choices: Which One is the Best?
USB - Bitcoin Mining Setup Guide
Have you purchased a USB Bitcoin miner and need to learn how to set it up?
USB - Bitcoin Mining Setup Guide
Additional Supplies you will need
Transcript - USB - Bitcoin Mining Setup Guide
What’s going on every one? This is Fred and today we’re going to build a Bitcoin miner. All right. So, if you’re unfamiliar with Bitcoin I do have another video that has all the 10 things that you need to know about Bitcoin. So, give that a watch, get caught up, come back and we’ll get started.
So, here’s all the pieces that you need to start building your own Bitcoin miner. I will place some links to all the parts down below so that you can get started on your project. Now, the first item that you want to pick up Setting up bitcoin mining on mac called a Raspberry Pi. Now, this is basically just a credit card sized computer. Now, the nice thing about having one of these is that this is a completely separate unit from your personal computer, which means you can mine for Bitcoins 24x7 without affecting your daily computer usage. Now, when you’re picking up one of these you want to make sure that you get the version B. Now, due to its size it’s very efficient on power consumption. This entire computer can be powered by USB Setting up bitcoin mining on mac next item on the list is just a plastic case for your Raspberry Pi. Now this is an optional item but I highly recommend it because it will protect your Raspberry Pi in case anything falls on top of it. Plus, it’s very inexpensive. This one was about $10. Okay. So, you’ll also have to get an SD card. Now this SD card basically acts as the hard drive for your Raspberry Pi. Now you want to get a 4 gigabyte minimum on this card. Now I have an 8 gigabyte just because it was on sale and easier to find at the time. The thing that you want to focus on is getting a class 10 SD class. And to power your Raspberry Pi you will need a micro USB Setting up bitcoin mining on mac USB cable. So, all the parts that I just listed basically creates a separate computer. Now this computer will run the mining software. All the parts that I list next will be the actual mining hardware that will mine for Bitcoins.
Okay, so this is the actual Setting up bitcoin mining on mac that mines for Bitcoins. This is called an ASIC miner or a Block Erupter. Now this is basically just a chip that has one job and that is to mine for Bitcoins. It could be powered by USB so you could plug a bunch of these into a USB port. Now this specific one mines at a rate of 335 megahashes per second. So, what I have is I have six of them so these will give me over 2 gigahashes of mining power. Okay. And to power all those Block Erupters you need to get a good quality powered USB hub. Now the keyword here is powered meaning that there is an eternal adapter that you plug into the wall outlet.
Now this will give it an even power across all of the USB ports. Now you don’t want to cheap out on this you definitely want to get a good quality hub. Now because your Bitcoin miner will be running 24x7, those Block Erupters tend to get pretty warm. Now what you can do is just get one of these USB fans, plug it into the USB port and this is a very good inexpensive way to keep things cool. Okay. Lastly, all you need is an Ethernet cable. Now this is what’s going to get your Bitcoin miner connected to the internet. Okay, so that’s all the hardware that you will need for this project. Let’s start putting everything together starting with the Raspberry Pi.
Okay, so the first thing you do is take apart the case and place your Raspberry Pi on the bottom piece. Now just go ahead and line everything up and it should snap together, like so. Then just go ahead and put the cover over just like that. Okay, so as you can see your Raspberry Pi will have two USB ports. A spot for your Ethernet connection it’s going to have some audio and video outputs. This Setting up bitcoin mining on mac is for the SD card. Here is a micro USB to power the unit. And then finally you’ll also have an HDMI output so Setting up bitcoin mining on mac you could connect this to a screen.
The next step is to insert your SD card into your Raspberry Pi. Now this SD card is already loaded with my mining software. Right now I’m using an operating system called MinePeon. Now if you’re not familiar with how to load up the software onto your SD card, I will be making another video going through the step by step instructions on how to do that. But until then just take your Raspberry Setting up bitcoin mining on mac and insert the card into its SD slot, like so. Okay, now let’s take a look at the USB hub. Now this is not plugged in yet. I just want to get everything installed prior to powering it up. The first thing that I’m going to do is install the power cord for the Raspberry Pi. Setting up bitcoin mining on mac going to put it in the first slot right here and then move this off to the side for later use.
Next I’m going to start plugging in the Block Erupters one by one. I have a total of six. Make sure they’re in there nice and firm evenly seeded. Like I mentioned before, each one of these Block Erupters are able to mine at roughly 335 megahashes per second. So with six of them I am getting roughly 2 gigahashes. All right, so I have six of them plugged in right here. And Setting up bitcoin mining on mac take your USB fan and just direct it above the Block Erupters. Now this USB Setting up bitcoin mining on mac has a USB 2.0 connection right here on the end. Now this is going to connect to the USB ports on the Raspberry Pi. So the Raspberry Pi has two USB ports we are just going to need one of them, like so.
Next, take your Ethernet cable, connect it to the Ethernet spot on your Raspberry Pi and connect the other end to your modem. Once you have everything plugged in just go ahead and power it up. Okay, so as you can see by these green LED indicators it’s just telling you that these Block Erupters are properly installed or in standby. All you need to do now is go into your mining software, set up your mining pools and start mining. It’s just easy as that guys.
All right, so that’s all Setting up bitcoin mining on mac hardware that you will need to start mining for Bitcoins. Now this mining rig is mining at over two gigahashes, which is not too bad considering the costs and simplicity of the entire project. Now I’m going to show you a quick screen shot of the performance that I am getting with this mining rig using the MinePeon software. Now if you need help setting up the mining software I will be uploading another video soon showing you the step by step instructions of how to get everything set up. But this video should give you a good head start. Start ordering the parts that you need and I will see you on the next video, but until then have fun mining guys.
Written by Bitcoin Mining on December 22, 2013.
Комментариев нет:
Отправить комментарий